Success in the Arctic isn’t about the gear you can rent on-site; it’s about bringing the specific, non-negotiable systems that prevent catastrophic failure in an environment that punishes every mistake.
- Your standard hiking gear is a liability; sweat freezing in your base layer or conductive heat loss through your sleeping pad are real, life-threatening risks.
- Survival depends on integrated systems—for moisture management, ground insulation, and communication—not on individual items.
Recommendation: Before packing a single item, shift your mindset from “what to bring” to “which failure point must I prevent?” This guide details the gear that answers that question.
An adventurer preparing for the vast, unforgiving landscapes of Nunavut or the Northwest Territories quickly realizes a standard hiking kit is dangerously inadequate. Many assume that extreme cold is the only enemy, and the solution is simply ‘more warmth’. This is the first, and potentially last, mistake. The real challenges are more insidious: managing moisture that can freeze you from the inside out, securing a shelter on ground that is permanently frozen solid, and maintaining a lifeline in a region where “help” is days, not hours, away. The gear you can rent locally—a heavy parka, perhaps—is for tourists. The equipment that keeps you alive is specialized, personal, and absolutely non-negotiable.
This is not a packing list. This is a survival doctrine. We will dissect the catastrophic failure points that are unique to the Canadian Arctic tundra and identify the specific gear systems required to mitigate them. Forget generic advice about layering; we will go deeper, into the science of why one material choice can save your life while another, seemingly similar one, can end it. This guide focuses exclusively on the critical equipment you must own, understand, and trust implicitly, because you cannot rent experience, and you cannot borrow a second chance.
This document is structured to address the most critical and often overlooked aspects of Arctic preparation. We will move from the gear closest to your skin to the equipment that connects you to the outside world, ensuring every component of your life-support system is analyzed and understood.
Summary: The Non-Negotiable Gear for Arctic Tundra Survival
- Wool vs Synthetic: Which Base Layer Prevents Sweat Freezing in the Arctic?
- Why Pitching a Tent on Permafrost Requires Different Stakes?
- Satellite Phone or InReach: What Do You Need Above the Tree Line?
- How to Sleep Soundly When the Sun Never Sets in July?
- The Shelter Mistake: Why You Shouldn’t Sleep Directly on the Ground?
- The Footwear Error That Ruins a Tundra Buggy Expedition
- How to Track the KP Index to Predict Northern Lights in the Yukon?
- The Land Access Mistake: Why You Can’t Just Hike Anywhere in Nunavut?
Wool vs Synthetic: Which Base Layer Prevents Sweat Freezing in the Arctic?
The single most dangerous element in the Arctic is not the cold; it’s your own sweat. When you exert yourself, you perspire. In a temperate climate, this moisture evaporates or is absorbed without issue. In the Arctic, that moisture can freeze within the fibres of your clothing, turning your insulating layer into a sheet of ice against your skin. This is a direct path to hypothermia. The choice of base layer—the fabric touching your body—is therefore your first line of defence against a catastrophic failure.
While many high-performance synthetics are marketed for their “moisture-wicking” properties, they primarily move moisture away from the skin. Merino wool operates on a different, more crucial principle. It is hygroscopic, meaning it actively absorbs moisture vapour before it even condenses into liquid sweat. In fact, high-quality merino wool can absorb up to 30% of its weight in moisture without feeling wet to the touch. This unique capability keeps the microclimate next to your skin significantly drier and warmer, preventing the chilling effect of damp fabric.
Synthetics, by contrast, can feel clammy once their wicking capacity is overwhelmed during high exertion. This clamminess is the precursor to freezing. For this reason, merino wool is not a preference; it is a tactical requirement for any serious tundra expedition. Your life depends on staying dry from the inside out, and that process begins with the right base layer. Do not compromise on this.
Why Pitching a Tent on Permafrost Requires Different Stakes?
Your shelter is your sanctuary, but on the tundra, its integrity is only as good as its anchors. Standard aluminum tent stakes, designed for soil, are utterly useless on permafrost—the layer of permanently frozen ground that lies just beneath the thin active layer of summer tundra. Attempting to hammer a standard stake into this rock-hard substrate will result in a bent, useless piece of metal and a dangerously unsecured tent. A strong gust of wind, common in the Arctic, can rip an improperly anchored tent away, leaving you completely exposed.
Securing a tent on permafrost requires specialized equipment and techniques. The primary tools are not standard stakes but hardened steel stakes designed for frozen or rocky ground. As a comparative analysis shows, these are fundamentally different in both design and application. For truly frozen, hard-packed permafrost, Nail Stakes or heavy-duty Military Stakes are mandatory. These are designed to be driven in with a mallet or hammer, penetrating where other stakes would simply bend or break.
The following table, based on field data for extreme conditions, illustrates the stark difference in stake performance. It is not just about holding power; it’s about the feasibility of installation itself.
| Stake Type | Best Conditions | Installation Method | Holding Power |
|---|---|---|---|
| Aluminum Stakes | Firm to moderately soft ground | Push or light hammer | Moderate |
| Military Stakes | Rocky or frozen soil | Heavy hammer required | Excellent |
| Nail Stakes | Hard-packed permafrost | Mallet or hammer | Very Good |
| Williwaw Stakes | Lightweight expeditions | Push or light hammer | Good |
In situations with deep snow cover over permafrost, another technique becomes essential: the “deadman anchor.” This involves burying an object—such as a stuff sack filled with snow or a specialized snow fluke—horizontally in a trench and compacting the snow over it. The guylines are attached to this buried anchor, creating an incredibly strong hold that is independent of penetrating the frozen ground. Mastering these anchoring systems is not an optional skill; it is a prerequisite for sheltering safely.

Satellite Phone or InReach: What Do You Need Above the Tree Line?
Above the treeline, there is no cell service. There is no Wi-Fi. Your connection to the outside world, and to any potential rescue, is a device you carry in your pack. The choice between a satellite messenger like a Garmin InReach and a full satellite phone is not one of preference, but of mission-specific risk assessment. Choosing incorrectly can mean the difference between coordinating a complex evacuation and sending a simple SOS into the void with no context.
A satellite messenger (InReach, Zoleo) is excellent for one-way SOS alerts and short, pre-set or custom text messages. It provides peace of mind for you and your family, and its long battery life is a significant advantage. However, its communication capability is limited. You cannot have a real-time, two-way conversation to diagnose a medical issue, relay complex logistical details, or coordinate with a charter pilot for a weather-dependent pickup. As one Arctic expedition planning expert states, this distinction is critical:
An InReach for texting family is sufficient for a guided tour, but a sat phone for detailed logistics is mandatory for a solo expedition requiring coordination with a charter flight.
– Arctic expedition planning expert, based on Canadian Arctic emergency response infrastructure analysis
For any independent, non-guided expedition in the Canadian Arctic, a satellite phone is mandatory equipment. It is your command-and-control centre. It allows you to speak directly with emergency services, a doctor, or your air charter. This ability for nuanced, real-time verbal communication is invaluable when plans change or a crisis unfolds. Furthermore, many high-north travel insurance policies, such as those from Canadian providers like TuGo or World Nomads, may have specific device requirements for their evacuation coverage to be valid. Assume nothing and verify everything. Your communication device is your lifeline; it must be robust enough for the complexity of your expedition.
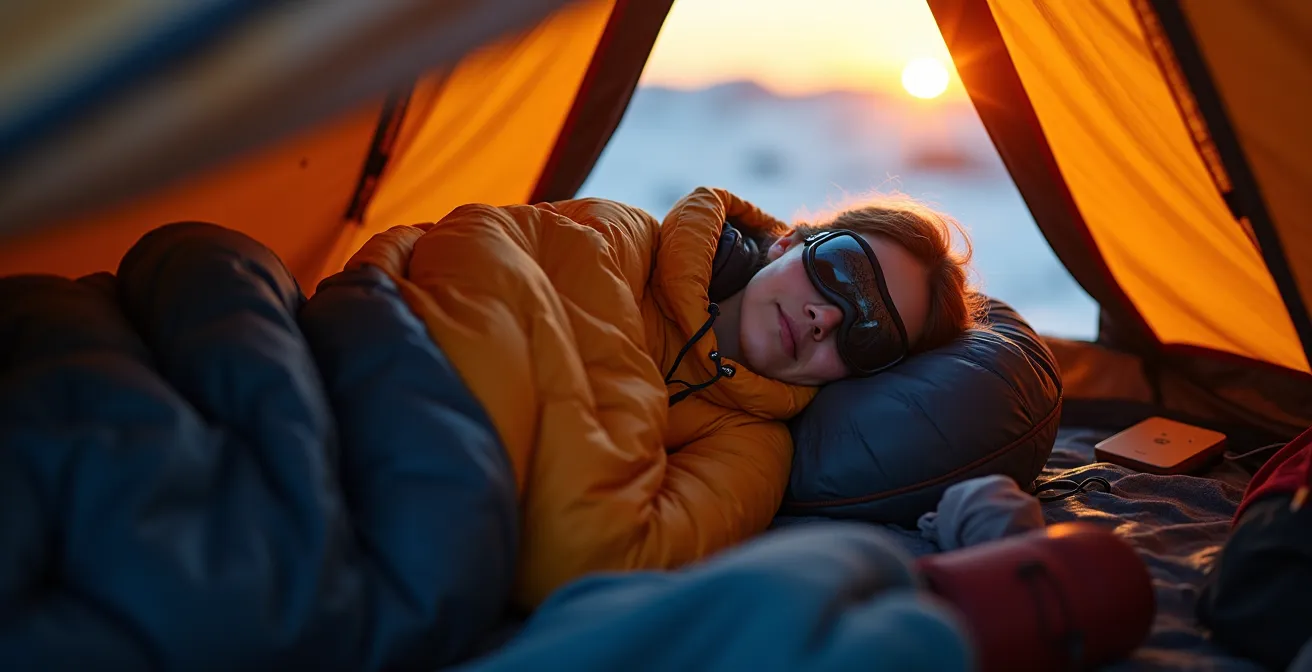
How to Sleep Soundly When the Sun Never Sets in July?
During the Arctic summer, the sun does not set. This 24-hour daylight, known as the Midnight Sun, is a profound psychological and physiological challenge. Your body’s circadian rhythm, the internal clock that governs sleep, is deeply tied to the light-dark cycle. Without darkness, your brain struggles to produce melatonin, the hormone that signals it’s time to sleep. This can lead to poor-quality rest, insomnia, and ultimately, impaired judgment—a dangerous state in a high-risk environment.
You cannot simply “get used to it.” You must actively engineer a night-time environment inside your tent. This is not about comfort; it is about maintaining cognitive function. As researchers at the Canadian High Arctic Research Station in Cambridge Bay know, strict sleep hygiene is critical for productivity and safety. They treat the continuous sun as an obstacle to be managed with discipline. Your strategy must be twofold: blocking external stimuli and conditioning your internal clock.
First, create artificial darkness. A high-quality, blackout-style eye mask is not optional; it is essential. Pair this with high-decibel-rated earplugs (minimum NRR 32) to block the perpetual wind and wildlife sounds. Second, enforce a rigid schedule. You must establish a strict “camp time,” with fixed hours for sleeping and waking, regardless of the sun’s position. This routine helps to train your body to recognize sleep cues even in the absence of natural darkness. Avoid screens and bright lights in your tent for at least an hour before your designated sleep time. These practices are about preserving your most important survival tool: your mind.
The Land Access Mistake: Why You Can’t Just Hike Anywhere in Nunavut?
One of the most profound and costly errors a visitor can make in the Canadian Arctic is assuming the land is an empty, open wilderness free for all to roam. This is fundamentally incorrect and deeply disrespectful. The territory of Nunavut is the homeland of the Inuit, and the Nunavut Land Claims Agreement established a legal framework where Inuit Owned Land (IOL) covers vast portions of the territory. These are private lands, and accessing them without permission is illegal trespassing.
Ignoring this fact is not just a legal risk; it’s a safety and cultural blunder. You may inadvertently wander into sensitive wildlife habitats, interfere with traditional hunting grounds, or disrespect sacred sites. The process for gaining access is formal and must be completed well in advance of your trip. It is not something you can arrange upon arrival. This is a critical, non-negotiable planning step that cannot be rented or improvised.
The permission process involves multiple stages and requires you to be organized and thorough. You must first identify the ownership of the land you plan to traverse and then contact the appropriate authorities with a detailed plan. Failure to follow this protocol will, at best, end your expedition before it starts. At worst, it could lead to serious legal consequences and endanger the fragile relationship between visitors and local communities.
Your Land Access Permission Checklist
- Step 1: Determine Land Status: Use the official Nunavut Land Claims Agreement maps to identify if your intended route crosses Inuit Owned Land.
- Step 2: Contact the Regional Inuit Association: Reach out to the appropriate body (e.g., the Qikiqtani Inuit Association for Baffin Island) for the region you will be visiting.
- Step 3: Submit Your Itinerary: Provide a detailed trip plan including dates, group size, specific routes, and all planned activities.
- Step 4: Consult the Hunters and Trappers Organization (HTO): Contact the local HTO to get information on current hunting activities or sensitive areas to avoid.
- Step 5: Obtain and Carry Written Permission: You must receive formal written permission and carry a copy of this documentation with you at all times during your trip.
- Step 6: Report Back: Follow any post-trip reporting requirements as stipulated by the association.
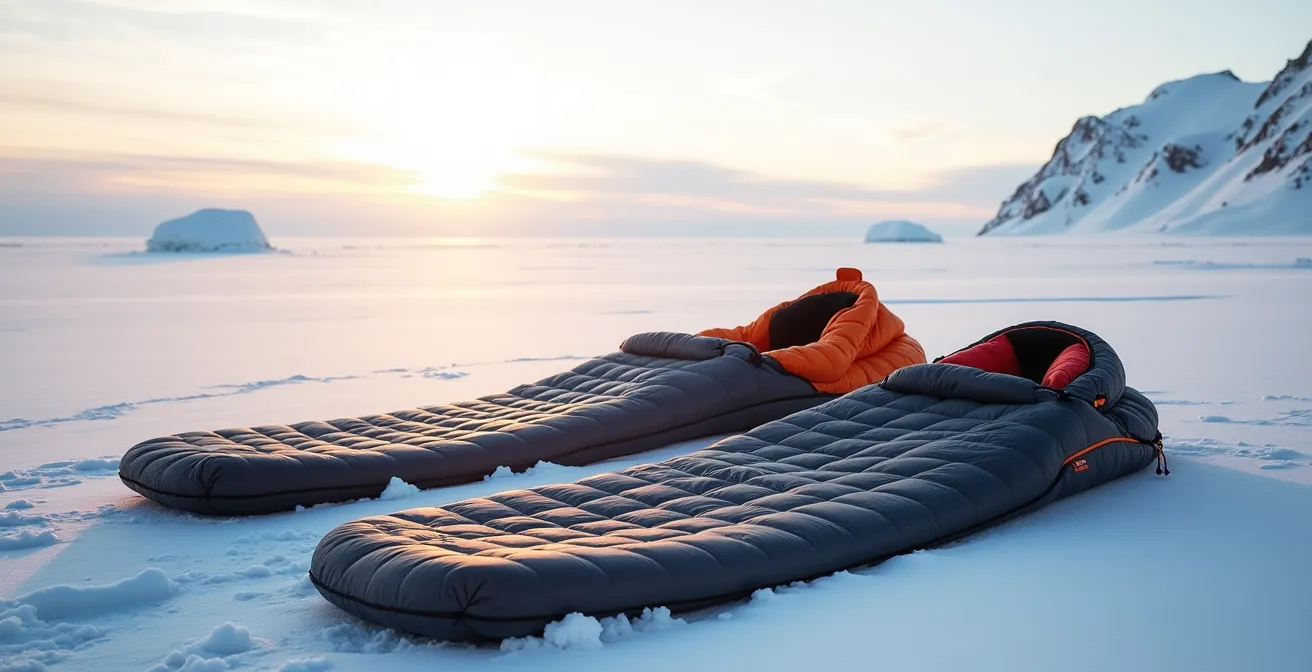
The Shelter Mistake: Why You Shouldn’t Sleep Directly on the Ground?
Even inside the most robust four-season tent, a critical battle is being fought: the battle against conductive heat loss. The frozen ground beneath you is a massive, relentless heat sink. Sleeping directly on the tent floor, even in the warmest sleeping bag, is like trying to heat a house with all the windows open in winter. The ground will continuously draw warmth from your body, a process that will inevitably lead to deep, dangerous chilling and hypothermia, regardless of your sleeping bag’s temperature rating.
The solution is insulation, but not just any insulation. You must create a barrier between your body and the ground with a sufficiently high R-value. The R-value is a measure of a material’s thermal resistance; the higher the R-value, the better it insulates. In Arctic conditions, a single, standard inflatable sleeping pad is insufficient. The cold will penetrate it. A double-pad system is the minimum mandatory requirement for sleeping on frozen ground. This typically involves combining a closed-cell foam pad (like a Z-Lite) on the bottom with a high-R-value inflatable pad on top.
The foam pad provides a fail-safe layer of insulation that cannot deflate, while the inflatable pad adds comfort and a significant boost to the total R-value. As field tests in -25°C conditions demonstrate, achieving a minimum combined R-value of 6.0 is critical. The table below outlines the necessary R-values for different temperature ranges. Ignoring this thermal science is a catastrophic mistake.
| Temperature Range | Single Pad Option | Recommended Combination | Total R-Value Needed |
|---|---|---|---|
| 0°C to -10°C | Inflatable (R-value 4) | Not required | 4.0 |
| -10°C to -20°C | Winter inflatable (R-value 5) | Add thin closed-cell | 5.5 |
| -20°C to -30°C | Insufficient alone | Inflatable + Z-Lite foam | 6.0+ |
| Below -30°C | Not possible | Double layer system mandatory | 7.0+ |
The Footwear Error That Ruins a Tundra Buggy Expedition
A Tundra Buggy expedition near Churchill, Manitoba, presents a unique thermal challenge. You spend long hours in a heated vehicle, punctuated by short periods outside in extreme cold to view polar bears or the aurora. The most common footwear mistake here is not wearing boots that are too cold, but wearing boots that are too warm for the time spent inside. This creates a dangerous “environmental mismatch” that can lead directly to frostbite.
As experienced Arctic guides will attest, the critical error is allowing your feet to sweat inside the heated buggy. An overly insulated, non-breathable boot will trap this moisture. When you step outside into the frigid air, that dampness in your socks and boot liners freezes almost instantly. Your boots’ insulation is now compromised, and your feet become dangerously cold far faster than if they had been dry. As one guide from Churchill puts it:
The error isn’t boots that are too cold, but boots that are too warm for the long periods inside the heated buggy, causing sweat that then freezes instantly when you step outside.
– Arctic expedition guide, Churchill Tundra Buggy operational guidelines
The solution is not a single pair of boots, but a footwear system based on removable liners. Pac boots, like those made by Sorel or Baffin, are the ideal choice. While inside the vehicle, you wear only the warm, breathable liners, allowing your feet to stay comfortable and dry. The waterproof outer shells are kept separate. Just before exiting the buggy, you slip your dry, liner-clad feet into the dry outer shells. This ensures you step onto the tundra with a completely dry, and therefore fully effective, insulation system. This disciplined management of moisture is non-negotiable for both safety and comfort.
Key Takeaways
- Moisture management is more critical than insulation; your primary enemy is sweat freezing in your layers.
- Survival depends on integrated systems (clothing, sleep, shelter), not individual high-end items. Every piece must work together.
- Respect for the land is a survival tool. Securing land access permission in Nunavut is a non-negotiable part of your expedition planning.
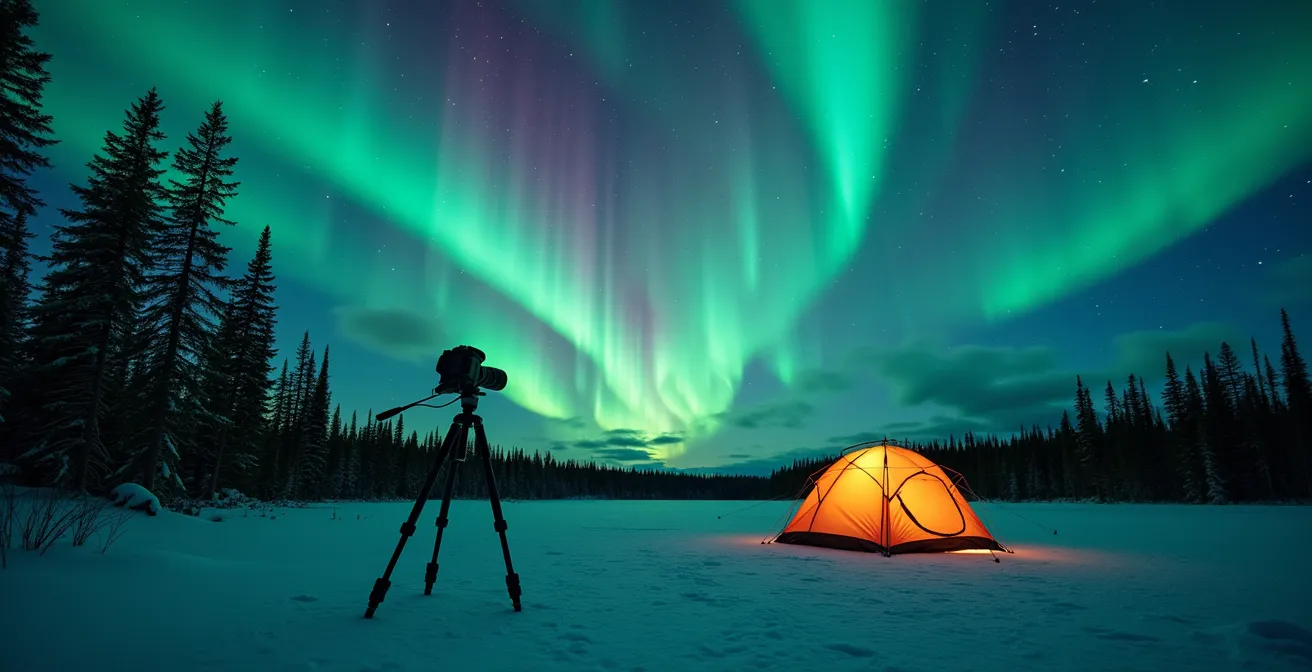
How to Track the KP Index to Predict Northern Lights in the Yukon?
After addressing the critical demands of survival, you can turn your attention to one of the Arctic’s greatest rewards: the Aurora Borealis. Witnessing the northern lights is a profound experience, but it is not purely a matter of luck. Predicting their appearance requires tracking the right data, and the key metric is the KP index. This index measures geomagnetic activity on a scale from 0 to 9. A higher number indicates a stronger storm and a higher likelihood of a vibrant aurora display visible further south.
However, a common misconception is that you need a very high KP index (5 or above) to see the lights. In the high latitudes of the Yukon, this is not true. Because you are already inside the auroral oval, spectacular displays are not only possible but common even at a low KP index of 2 or 3. Waiting for a “major storm” forecast means you could miss incredible shows that happen on seemingly quiet nights.
Your strategy should be to monitor reliable, Canada-specific forecasting resources. The University of Alberta’s AuroraWatch and the Canadian Space Agency’s official aurora forecast are your primary sources. When these services issue a “yellow alert” (active) or even just indicate a KP of 2 or 3 for your location, you must be ready to act. A good forecast is the trigger for preparation. This means pre-warming your camera batteries inside your jacket, setting up your tripod, and having your warmest layers ready for a middle-of-the-night excursion. The aurora waits for no one, and being prepared to move quickly when the forecast is favourable is the difference between a fleeting glimpse and a memory that lasts a lifetime.
Frequently Asked Questions about Arctic Expedition Gear
What communication device is required for Arctic emergencies?
You must bring a Personal Locator Beacon (PLB) or satellite messenger with two-way communication capabilities for any remote travel. It is also critical to confirm that your travel insurance policy explicitly covers remote rescue and evacuation in the Arctic, as some policies have specific device requirements for coverage to be valid.
How long does Arctic search and rescue typically take?
You must operate under the assumption that help is days away, not hours. In extremely remote areas like the Arctic Circle Trail, it can take several days for others to even raise an alarm if you are injured or overdue. The costs associated with search and rescue operations in this region are enormous, reinforcing the need for proper insurance and self-sufficiency.
What are the best Canadian aurora forecasting resources?
For reliable, localized forecasts, your primary tools should be the University of Alberta’s AuroraWatch, which provides real-time alerts for Canada, and the official aurora forecast published by the Canadian Space Agency. These resources provide data tailored to northern latitudes.
How should aurora forecasts trigger gear preparation?
A positive forecast (even a low KP of 2-3 in the Yukon) is your signal to prepare immediately. This includes pre-warming camera batteries by keeping them in an inner pocket of your jacket, having your tripod readily accessible, and laying out your warmest outer layers for a potential 2 a.m. departure. The best displays can be brief, and readiness is key.