Misreading a tide table isn’t an inconvenience; it’s a potentially fatal error that my team and I respond to every season.
- The most dangerous time on the flats is not at high tide, but during the 3rd and 4th hours of the rising tide when water velocity is at its peak.
- Your smartphone’s weather app is not a substitute for official Canadian Hydrographic Service (CHS) tide tables. Generic data can be dangerously inaccurate for specific coves.
- The highest line of seaweed on the beach (the wrack line) is your non-negotiable “red zone.” Parking or setting up camp below it is a critical mistake.
Recommendation: Treat every coastal outing as a mission. Your primary objective is a safe return. This means identifying the time of low tide, setting a hard “turn-back” alarm 3 hours after, and always having a primary and secondary exit route planned.
Listen up. My name isn’t important, but my job is. I’m a Coast Guard Search and Rescue officer. I’m the person you call when your beautiful day exploring Canada’s coastline turns into a life-threatening emergency. The single biggest reason people get into trouble? They don’t respect the water. They see a vast, open beach at low tide and think they have all the time in the world. They are wrong. The mudflats of the Bay of Fundy or the dramatic shores of British Columbia are not a park; they are a dynamic environment where the water level can rise vertically faster than you can run.
You’ve probably heard the basic advice: “check the tides.” This is dangerously insufficient. A tourist checks the tides to see the sights. A survivor understands the mechanics of the tide to execute a safe exit. The difference is tactical awareness. Many believe the risk increases linearly as the tide comes in. This is a fatal misconception. The real danger lies in the exponential acceleration of the water’s speed and volume during the middle of the tidal cycle. This guide isn’t about enjoying the scenery. It’s a field briefing on how to interpret tide tables and environmental cues to prevent you from becoming another statistic for my team to recover.
We are not going to talk about the moon or gravitational pull. We are going to talk about operational safety. We will cover the “Rule of Twelfths” as a survival clock, the specific hazards for activities like kayaking and photography, and the critical mistakes that leave cars—and people—trapped. Your survival depends on shifting your mindset from casual observer to tactical planner. This briefing is your first step.
This document is structured as a series of operational briefings, each tackling a critical risk factor associated with tidal waters in Canada. Review each section to understand the specific threats and the required countermeasures for a safe return to shore.
Summary: A Tactical Briefing on Tidal Survival
- Why the “Rule of Twelfths” Matters for Your Beach Walk Safety?
- Low Tide Photography: How to Protect Your Tripod from Salt and Mud Sinking?
- Slack Tide vs Mid-Tide: When Is It Safe to Kayak Through Narrow Channels?
- The Parking Mistake That Leaves Your Car Underwater at High Tide
- When to Arrive to See the Full Transformation from Low to High Tide?
- Why a Wet Exit Skill is Mandatory Before Kayaking in Orca Waters?
- How Fast Do Currents Move Near the Grand Banks?
- How to Find Fossils at Joggins Fossil Cliffs Without Breaking the Law?
Why the “Rule of Twelfths” Matters for Your Beach Walk Safety?
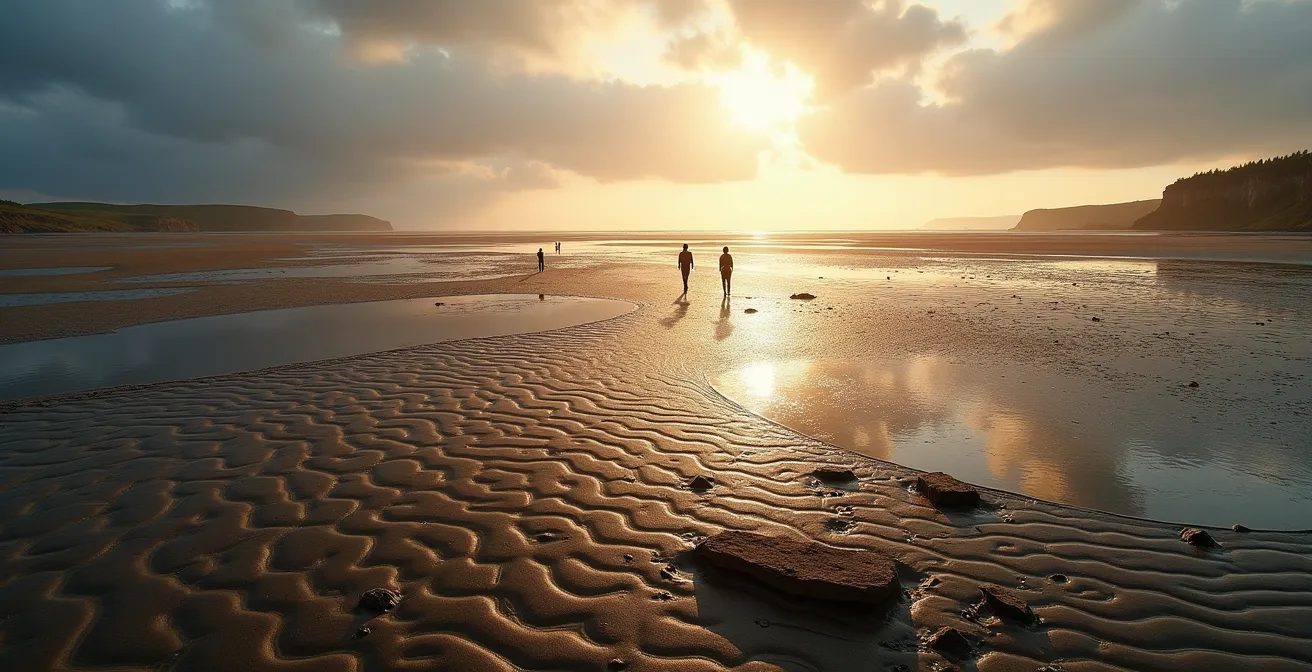
Forget the idea that the tide rises at a steady pace. This is the single most dangerous assumption you can make. The “Rule of Twelfths” is a critical survival heuristic that describes the non-linear speed of a typical semi-diurnal tide. In simple terms, the water moves slowest at the very beginning and very end of a tidal cycle, and fastest in the middle. The total rise in water is divided into twelfths. In the first hour of a rising tide, the water rises by 1/12th. In the second hour, 2/12ths. But in the third and fourth hours, it rises by 3/12ths for each hour. This is your point of no return. 6/12ths—or half the total tidal rise—occurs in just these two hours.
In places like the Bay of Fundy, this is not an abstract concept. During certain cycles, perigean-spring tides in the Minas Basin can reach over 16 meters. This means that in the third and fourth hours, the water could rise by 4 meters per hour. That’s a vertical rise faster than you can climb. It doesn’t just creep up the beach; it floods channels behind you, cutting off your escape routes. You are not just being pushed back; you are being surrounded. Your leisurely walk on the seafloor has now become a tactical retreat from a rapidly shrinking island. This exponential risk is why a three-hour “safety buffer” after low tide is a hard rule, not a suggestion.
The visual above conceptualizes this lethal progression. The highest tidal velocity during those middle hours is what traps people. They walk out for two hours, turn around, and find the landscape has completely changed. Creeks that were ankle-deep are now impassable torrents. The firm sand you walked on is now quicksand-like mud. You must plan your excursion based not on the time of high tide, but on the time the third hour of rising tide begins. That is your non-negotiable deadline to be back on high, safe ground.
Low Tide Photography: How to Protect Your Tripod from Salt and Mud Sinking?
Your focus on capturing the perfect low-tide landscape can lead to equipment damage and, more importantly, environmental harm. The intertidal zone is not just sand and rock; it’s a fragile ecosystem. When you are setting up for a shot, your primary concern is stability, but your responsibility extends to minimizing your impact. Saltwater is relentlessly corrosive. A tripod that has been submerged, even briefly, in seawater or corrosive mud will see its leg locks, joints, and metal components begin to seize and rust within days if not meticulously cleaned.
The mudflats, especially in areas like the Bay of Fundy, are deceptive. The surface may seem firm, but it’s often a thin crust over deep, silty mud. A tripod, especially with a heavy camera, can sink slowly but surely. By the time you notice, it can be deeply embedded. Pulling it out can disturb sediment layers that have taken years to form. As Parks Canada emphasizes, the principle of Leave No Trace is paramount. Exploring areas like Point Wolfe Beach or Alma Beach is encouraged, but it must be done with respect. This means staying on durable surfaces whenever possible and not altering the environment for your photograph.
Your equipment protection strategy should be twofold: defense and decontamination. Use tripod “snowshoes” or custom-made plates to distribute the weight and prevent sinking. Wrap the lower legs in plastic bags or dedicated waterproof leggings. After every single outing, no exceptions, your gear must be completely disassembled and rinsed thoroughly with fresh water. Let it dry completely before reassembly. A spray of silicone lubricant on moving parts can displace moisture. This isn’t just about protecting your investment; it’s about a mindset of preparedness and respecting a powerful environment.
Slack Tide vs Mid-Tide: When Is It Safe to Kayak Through Narrow Channels?
For a coastal kayaker, the difference between slack tide and mid-tide is the difference between a pleasant paddle and a life-threatening emergency. Slack tide is the brief period, sometimes only 15 to 30 minutes, when the water is stationary as the tide reverses from rising to falling, or vice-versa. This is your window. This is the only safe time to transit through narrow channels, passages, or over sandbars where currents can become dangerously concentrated.
Conversely, mid-tide—the period corresponding to the third and fourth hours of the tidal cycle—is the time of maximum current velocity. In constricted channels, this flow is amplified exponentially. Passages like Skookumchuck Narrows in British Columbia are infamous for this phenomenon, where seemingly calm waters can transform into a raging torrent. During peak flow, these dangerous mid-tide currents in BC channels can exceed 16 knots (almost 30 km/h). No kayaker, regardless of skill, can paddle against that. Attempting to transit during this period leads to capsizing, being swept out to sea, or being pinned against rocks or bridge footings by the immense pressure of the water.
Reading official Canadian current tables is a non-negotiable skill. You must learn to identify the exact time of slack water for your specific location. As the University of British Columbia’s marine weather course explains:
The bolded column indicates the time of slack (i.e., zero) current. In reading the current tables, you can tell if the bolded value is high or low slack by referring to the +/- information on the current speed (knots).
– University of British Columbia, EOAS Marine Weather Course Materials
Your mission plan must be built around these slack tide windows. Arrive well in advance, wait for the current to cease, and transit promptly. If you miss the window, you do not proceed. You wait for the next slack tide, which could be six hours away. Your ego is not worth a search and rescue call-out.
The Parking Mistake That Leaves Your Car Underwater at High Tide
Every season, my team sees it: a vehicle, parked on what looked like a perfectly dry, hard-packed beach, now sitting in four feet of saltwater. Your car is not a boat. This is not an accident; it is a failure to read the environment. The most critical environmental cue you are ignoring is the wrack line. This is the highest line of seaweed, driftwood, and other debris left on the beach by the previous high tide. It is a very clear, physical demarcation of the high water mark. Parking your vehicle anywhere below this line is gambling, and the house always wins.
In many coastal Canadian communities, especially in the Cliffs of Fundy Geopark, fishing access roads run directly onto the beach. These are not for public use. They are unmaintained, often cross private land, and lead you directly into the danger zone. The sand may feel firm under your tires, but it’s a trap. The weight of a vehicle can easily cause it to become stuck, and with a rising tide, you have minutes, not hours, to act. A tow truck that handles tidal recoveries is expensive and not always available. You are likely to lose your vehicle.
Treating your vehicle’s safety is as critical as your own. Before you even get out of your car, your mission is to assess the parking area against the tide’s threat. This requires a systematic check, not a casual glance. You must actively look for and obey all warning signs, which are often bilingual in English and French. These signs are not decorations; they are official warnings based on hard experience.
Action Plan: Canadian Beach Parking Safety Checklist
- Inspect for bilingual warning signs (English/French) at all beach access points.
- Identify the wrack line—the highest line of seaweed and debris on the beach.
- Park your vehicle at least 10 meters above the wrack line.
- Verify your parking safety against official DFO/MPO tide tables, not generic apps.
- Set a parking alarm on your phone for 2 hours before the predicted high tide.

When to Arrive to See the Full Transformation from Low to High Tide?
Observing a full tidal cycle, especially in a location with an extreme range like the Bay of Fundy, is a lesson in the power of nature. But to witness the entire transformation safely, your timing is everything. It’s a commitment of over six hours. You cannot simply show up and expect to see the full show. The core of your planning revolves around one key number: the average time between high and low tide in the Bay of Fundy is about 6 hours and 13 minutes.
To see the full transformation from a completely exposed seabed to the peak of high tide, your arrival must be synchronized with the exact time of low tide. Arrive at, or slightly before, the published low tide time for your specific location. This gives you the maximum window to explore the ocean floor, but your internal clock must already be running. Remember the Rule of Twelfths: the first two hours will be deceptively calm. This is your time to explore, but your situational awareness must be at its peak. You must already have identified your exit routes and noted the landmarks that will soon be submerged.
A prime example of this dramatic change is the Reversing Falls in Saint John, New Brunswick. Here, the powerful Fundy tide overcomes the flow of the St. John River, forcing it to flow “backwards.” To see this, you must time your visit for both slack tide (to see the calm before the reversal) and mid-tide (to see the full force of the rapids). This requires precise planning. Also, note that tides are not perfectly consistent. The cycle advances by about 50 minutes to an hour each day. The high tide time tomorrow will be later than it is today. You must consult the tables for the specific day of your visit.
Why a Wet Exit Skill is Mandatory Before Kayaking in Orca Waters?
Kayaking in the coastal waters of British Columbia, home to resident and transient orcas, is a profound experience. It is also an undertaking with zero margin for error. The primary, immediate threat is not the wildlife; it is the water itself. The ocean here is dangerously cold. Even on a hot summer day, the cold Canadian Pacific waters maintain temperatures of 8-12°C year-round. Cold water shock is an involuntary gasp reflex upon immersion, which can cause you to inhale water and drown instantly. If you survive that, hypothermia begins to set in within minutes.
This is why a wet exit is not an “advanced” skill; it is the absolute minimum requirement. A wet exit is the procedure for releasing your spray skirt and exiting a capsized kayak. You must be able to perform it calmly and automatically in cold, churning water. Without this practiced skill, panic is almost certain. You will struggle, waste precious energy, and dramatically accelerate the onset of hypothermia. Before you even think of paddling in these waters, you must have taken a course and practiced this skill until it is muscle memory.
The presence of orcas adds another layer of critical responsibility. These are powerful animals, and your presence is a stressor. As a matter of law and respect, you must maintain a significant distance. The Department of Fisheries and Oceans Canada is explicit in its regulations:
Reference Canada’s Marine Mammal Regulations, which mandate a minimum 400-meter approach distance for killer whales in BC.
– Department of Fisheries and Oceans Canada, Marine Mammal Regulations
A capsize near wildlife not only endangers you but also creates a potential disturbance for the animals, which could lead to a search and rescue operation in their vicinity. Your ability to self-rescue or perform a wet exit is your first line of defense, ensuring you can manage your own emergency without creating a larger incident.
How Fast Do Currents Move Near the Grand Banks?
The Grand Banks of Newfoundland are legendary, known as one of the richest fishing grounds on earth. This richness is born from a violent collision: the cold, south-flowing Labrador Current meeting the warm, north-flowing Gulf Stream. For the mariner, this collision creates some of the most treacherous, unpredictable waters on the planet. The currents here are not gentle drifts; they are powerful ocean rivers that can dramatically affect a vessel’s course and speed.
Even on a seemingly calm day, the unseen force of the current is significant. While not as explosively fast as in a narrow coastal channel, the Labrador Current near the Grand Banks can exceed speeds of 3 knots (over 5.5 km/h). For a fishing vessel, a sailboat, or even a large modern ship, this is a constant force that must be factored into every navigational calculation. Ignoring it means burning more fuel, missing arrival times, and being pushed off course into potentially more dangerous areas.
The danger is compounded by a secondary effect of this thermal collision: fog. The meeting of cold and warm air masses above the currents generates the infamous, dense fog of the Grand Banks. It can reduce visibility to zero in a matter of minutes, creating a disorienting and hazardous environment. This combination of strong currents and sudden fog has been the downfall of countless vessels throughout Newfoundland’s maritime history. For any modern mariner, consulting a current atlas and understanding the expected set and drift is as fundamental as checking the weather forecast. It’s a critical component of safe passage planning in these historically dangerous waters.
Key takeaways
- The “Rule of Twelfths” is a survival law: the 3rd and 4th hours of a rising tide have the highest water velocity and are the most dangerous.
- Slack tide is the only safe window for kayaking in narrow channels; mid-tide currents can be faster than you can paddle and are a lethal trap.
- The “wrack line” (high-tide debris line) is your non-negotiable safety boundary. Never park a vehicle or set up camp below it.
How to Find Fossils at Joggins Fossil Cliffs Without Breaking the Law?
The Joggins Fossil Cliffs in Nova Scotia are a UNESCO World Heritage Site, a time capsule of the Coal Age. Walking the beach here is like walking through a 300-million-year-old forest. The opportunity to see a fossil in the rock where it was laid down is a unique privilege, and it comes with strict, non-negotiable rules. This is not a souvenir shop. The cliffs and any fossils found on the beach are protected by law. Your mission here is one of observation and reporting, not collection.
First, your safety is tied to the tides. Just like anywhere else in the Bay of Fundy, the tidal range is extreme. You must check the tide tables for Joggins before you depart. The safest and most productive time to be on the beach is in the hours following a high tide, as the receding water exposes new sections of the cliff face and freshly fallen rocks. Arriving 2-3 hours after high tide is the optimal strategy. Any exploration must be done with one eye on the cliffs and the other on the water, ensuring you have a clear exit route at all times.
The legal framework is absolute. Under the Nova Scotia Special Places Protection Act, it is illegal to excavate, damage, or remove fossils. Your role as a visitor is to be a scout. The best way to engage with the site is to join an official guided tour from the Joggins Fossil Centre. Their experts can point out significant finds and explain the geological context. If you find something on your own, your duty is clear. As the provincial legislation dictates:
Any fossil found on the beach MUST be reported to the Joggins Fossil Centre staff.
– Nova Scotia Special Places Protection Act, Provincial Legislation
If you make a discovery, you should photograph it, record its location using GPS or by referencing distinct landmarks, and report it immediately to the Centre. This allows scientists to properly document and, if necessary, professionally excavate the find for preservation and study. You become a part of the scientific process, not a detriment to it.
Your safety on the coast is your responsibility. It is not about luck; it is about preparation, knowledge, and respect for the immense power of the ocean. Before your next coastal trip, your mission is to obtain official Canadian tide and current tables for your specific area and practice reading them until it becomes second nature. Understand them not as a schedule, but as a survival briefing. Your life may depend on it.