The best Cabot Trail red chair photo isn’t found by waiting in line; it’s created by strategically avoiding it.
- Identify “unofficial” photo ops with better views and no crowds, like community-placed chairs or natural rock ledges.
- Plan a “light-driven itinerary,” prioritizing the western coast for golden hour and building your stop schedule around it.
- Master safe, legal pull-overs on non-obvious shoulder spots to access unique, uncrowded vantage points.
Recommendation: Instead of chasing the official Parks Canada locations, adopt a location scout’s mindset to choreograph your stops for superior light, composition, and a stress-free experience.
You’ve seen the shot on Instagram a thousand times: a pair of vibrant red Adirondack chairs perched perfectly on a cliff, overlooking the dramatic, winding coastline of the Cabot Trail. It’s the quintessential Cape Breton photo op. But what the pictures don’t show is the queue of cars waiting for the same spot, the tour bus unloading dozens of people, and the pressure to take your shot in 30 seconds before the next group glares at you. The common advice is to “go early” or “be patient,” but for a photographer, that’s not a strategy; it’s a compromise.
This guide isn’t about how to endure the crowds. It’s about how to outsmart them entirely. The real secret to getting a spectacular, unique red chair-style photo isn’t about finding the *official* chairs. It’s about mastering the art of location hacking. It’s about thinking like a photographer and location scout, not a tourist. We’ll treat the entire 298-kilometre trail as our personal studio, choreographing a route based on light and opportunity, not just a map. We’re ditching the checklist mentality and embracing a tactical approach to find better views, safer stops, and that iconic shot, without the wait.
This article provides a complete tactical breakdown for photographers and savvy travellers. You will discover how to locate superior unofficial viewpoints, calculate the optimal driving speed for a photo-centric journey, and identify safe stopping points that others miss, all while respecting the natural environment and local regulations.
Summary: Your Tactical Guide to Cabot Trail Photography
- Are There Unofficial Red Chair Locations That Offer Better Views?
- The Speed Sweet Spot: What Average Km/h Allows 10 Stops in 5 Hours?
- The Blind Curve Stop: Where is it Legal and Safe to Pull Over on the Trail?
- Are Drones Legal to Fly Over the Cabot Trail Coastal Views?
- Which Section of the Cabot Trail Has the Best Playgrounds or Beaches for Kids?
- Which Side of the Trail Offers the Best Western Light for Photography?
- The Tripod Placement Mistake That Causes Cliff-Edge Falls
- How to Find a “Kitchen Party” Vibe in a Formal Celtic Venue?
Are There Unofficial Red Chair Locations That Offer Better Views?
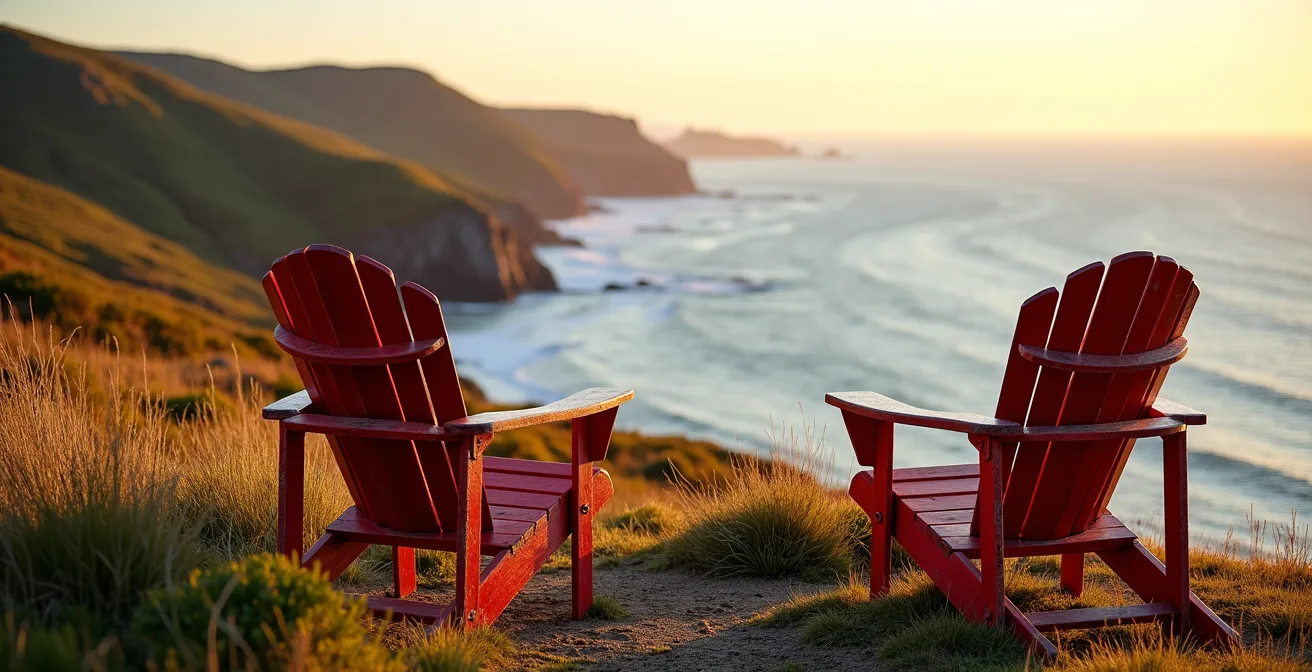
Yes, absolutely—and they are the key to a unique shot. The official Parks Canada red chairs are iconic, but their fame is their downfall for serious photographers. They are magnets for crowds, leading to rushed photos and generic compositions. The real strategy is to hunt for what I call an “Unofficial Throne.” This could be a perfectly placed boulder, a weathered log, or even community-placed chairs that aren’t on any tourist map. The goal isn’t the chair itself; it’s the vantage point it provides.
As you can see, the most powerful images often come from places without any official infrastructure. Start by looking for short, unmarked trails leading off the main lookouts. These often lead to quiet, stunning ledges just a few hundred metres away from the crowds. More importantly, keep an eye out for local businesses that create their own photo ops. A prime example is the Inverary Resort in Baddeck, which has its own red chairs in a peaceful setting by the water. These spots offer the same symbolic feel but with a fraction of the foot traffic, allowing you to take your time and compose the perfect shot.
The Speed Sweet Spot: What Average Km/h Allows 10 Stops in 5 Hours?
Forget trying to “complete the loop.” Your goal is viewpoint choreography, not a race. Road trip experts say the entire Cabot Trail loop takes a minimum of four hours to complete with no stops, which is a recipe for photographic disappointment. To build a successful photo itinerary, you must budget for time, not just distance. Aiming for 10 quality photo stops over 5 hours is ambitious but achievable with a tactical approach to your speed. This means abandoning a consistent pace and adapting to the terrain and opportunities.
A realistic plan requires breaking the trail into segments and understanding the variable speeds. The winding, mountainous sections demand a much slower pace, which is perfect for scouting compositions. The straighter inland sections allow you to make up time. A speed of around 50-60 km/h in the scenic coastal areas is the sweet spot. It’s slow enough to spot potential pull-offs but fast enough to cover ground. In contrast, you can comfortably drive 70-80 km/h on the stretch between Baddeck and Chéticamp. This strategic variation is what allows you to “bank” time for your stops.
| Trail Section | Average Speed | Distance | Driving Time |
|---|---|---|---|
| Chéticamp to Pleasant Bay | 40-50 km/h | 46 km | 60-70 min |
| Pleasant Bay to Cape North | 50-60 km/h | 45 km | 45-55 min |
| Cape North to Ingonish | 50-60 km/h | 60 km | 60-75 min |
| Baddeck to Chéticamp | 70-80 km/h | 87 km | 65-75 min |
By using this data, you can plan a 5-hour drive that includes approximately 60-90 minutes of dedicated stop time, easily accommodating 10 short photo sessions. Forget the total loop time; focus on mastering each segment.
The Blind Curve Stop: Where is it Legal and Safe to Pull Over on the Trail?
The best views are almost never from the designated lookouts. They’re often found on a slight bend in the road or an unmarked shoulder. But stopping here is risky, both legally and for your safety. Mastering “safe-stopping geometry” is a non-negotiable skill on the Cabot Trail. The absolute rule is: never stop on a blind curve or in any spot where you aren’t completely off the paved roadway. The shoulders are narrow, and traffic, including large RVs, moves quickly.
While there are 26 official, crowded lookoffs, the real gold is in the smaller, wider gravel pull-offs between them. Look for spots with clear sightlines in both directions and enough space for your entire vehicle to be off the asphalt. Use your hazard lights well in advance to signal your intention to pull over. It’s also critical to know the local laws; according to the Nova Scotia Motor Vehicle Act, you must slow down to 60 kilometres per hour when passing any vehicle stopped on the shoulder with its lights flashing. Assume others might not, so be hyper-aware when getting out of your car.

A good strategy is driving the trail counter-clockwise (starting from Chéticamp). This puts you on the ocean side of the road, making it significantly easier and safer to enter and exit right-hand pull-offs without crossing traffic. This simple choice drastically increases your opportunities for spontaneous, safe stops at unique vantage points.
Are Drones Legal to Fly Over the Cabot Trail Coastal Views?
The short answer is a hard no, at least not where you think. A huge portion of the most scenic coastal views on the Cabot Trail lies within the boundaries of Cape Breton Highlands National Park. Parks Canada has a strict, blanket prohibition on the recreational use of drones within all national parks. This isn’t just a suggestion; it’s a regulation enforced with severe penalties. Flying a drone in the park without a special permit can result in your gear being confiscated and facing fines up to $25,000. It’s simply not worth the risk to your wallet or your gear.
The rules are in place to protect wildlife from disturbance, as well as to preserve the peace and safety of other visitors. So, what’s the alternative for getting those epic, high-angle shots? It’s time to get creative with your existing gear. One of the best hacks is using a GoPro or a lightweight camera on a long extension pole. From an already elevated lookout, extending a camera 10-15 feet out over the cliff edge can create a surprisingly effective drone-like perspective, capturing the dramatic drop and coastline below. This technique is perfectly legal, safe when done carefully, and gives you a unique composition that others won’t have.
While some areas outside the park boundaries, such as certain villages, might permit drone use, you must always verify the location on Transport Canada’s official drone site map and check for local municipal bylaws. For most of the iconic coastal drive, however, you should assume it’s a no-fly zone.
Which Section of the Cabot Trail Has the Best Playgrounds or Beaches for Kids?
Executing a photo-centric road trip with kids requires a different kind of location hacking: hacking their patience. The key is to intersperse your scenic photo stops with destinations that are explicitly for them. The eastern side of the trail, particularly the Ingonish area, is the undisputed champion for family-friendly breaks. Ingonish isn’t just one stop; it’s a cluster of opportunities. The famous Ingonish Beach has a unique barrier of beach stones separating the pounding Atlantic surf from a calm, freshwater lake on the other side. This makes it a perfect spot where kids can swim safely in the lake while you capture stunning coastal views just steps away.
Another essential stop on the western side is the Adventure Ship playground in Chéticamp. It’s an ideal first or last stop on the loop to let kids burn off energy before or after a long drive. For toddlers and younger children, the tide pools at Pleasant Bay offer a fantastic natural playground for exploration during low tide. Here are a few top-tier stops to build into your itinerary:
- Chéticamp: The large, boat-themed playground is a must-visit for kids needing to climb and run.
- Ingonish Beach: Offers the best of both worlds with its calm freshwater lake and dramatic ocean beach.
- Neil’s Harbour: A picturesque fishing village with a small, charming beach nearby that’s great for a quick stop.
- Baddeck: Features multiple playgrounds and the Alexander Graham Bell Museum, offering an educational-but-fun diversion.
By strategically planning these “kid pit stops,” you can ensure a peaceful drive and have more focused, uninterrupted time when you arrive at your own photo destinations.
Which Side of the Trail Offers the Best Western Light for Photography?
This is the most critical tactical decision you’ll make. For photographers, the Cabot Trail isn’t one loop; it’s two distinct coasts, each with its own optimal light. While the east coast is for sunrises, the western coast is unequivocally the place to be for the best afternoon and sunset light. This section, running from Chéticamp up to Pleasant Bay, faces the Gulf of St. Lawrence and is perfectly positioned to capture the warm, golden glow of the setting sun.
To truly nail the shot, you need to plan a light-driven itinerary. This means timing your arrival on the western coast for the golden hour—the period roughly starting 90 minutes before sunset. During this window, the light is soft, directional, and bathes the rugged cliffs and rolling highlands in a magical, warm tone. The shadows become long and dramatic, adding depth and texture to your landscape photos. Driving counter-clockwise ensures you hit this stretch at the perfect time of day, assuming you start from the Baddeck area in the late morning or early afternoon.
| Coast Side | Best Light Time | Key Locations | Photography Style |
|---|---|---|---|
| Western (Gulf of St. Lawrence) | Late afternoon to sunset | Chéticamp to Pleasant Bay | Golden hour, warm tones |
| Eastern (Atlantic) | Sunrise to mid-morning | Ingonish area | Dramatic sunrise, cool tones |
Basing your direction of travel on the time of day and desired light quality, rather than arbitrary convention, is a professional photographer’s tactic. For that quintessential warm, glowing shot of the road snaking along the coast, the western side in the late afternoon is non-negotiable.
Key Takeaways
- Ditch the official red chairs and hunt for “Unofficial Thrones”—unique, crowd-free photo ops like community chairs or natural formations.
- Plan a “light-driven itinerary” by prioritizing the western coast for the 90-minute golden hour window before sunset.
- Master “safe-stopping geometry” by using small, unmarked gravel pull-offs and driving counter-clockwise for easier access.
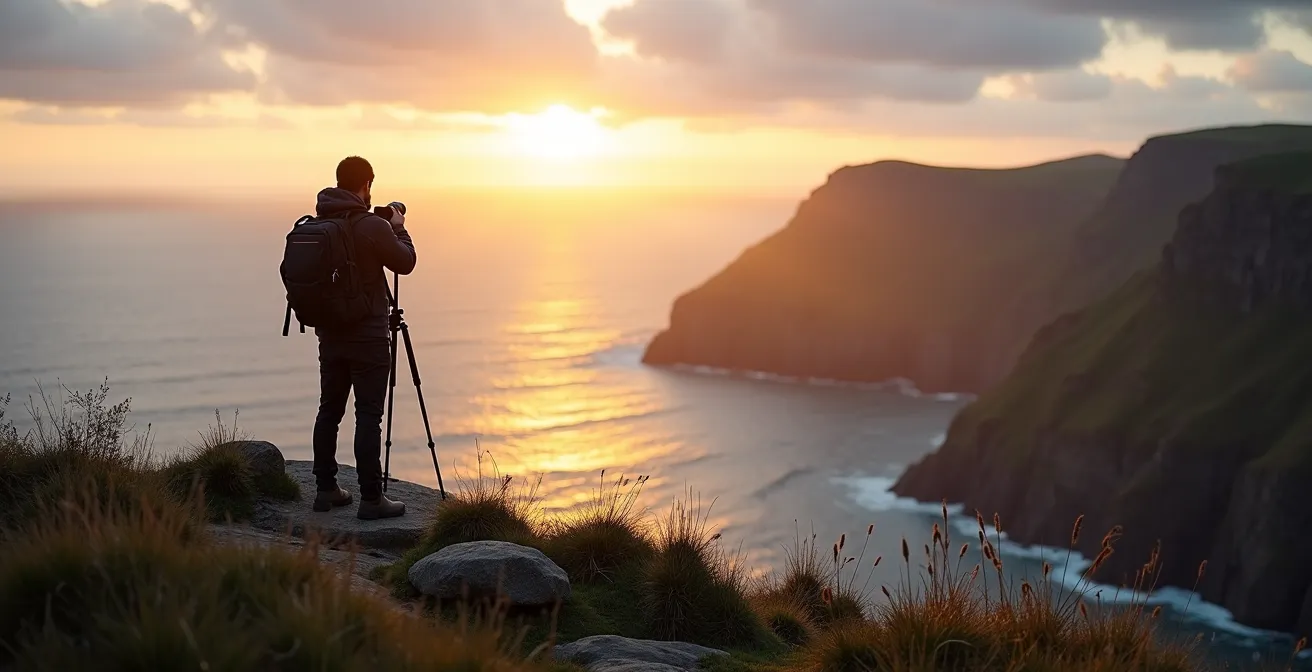
The Tripod Placement Mistake That Causes Cliff-Edge Falls
The rugged, dramatic cliffs of the Cabot Trail are a huge part of its appeal, but they are also a serious hazard. One of the most common and dangerous mistakes photographers make is improper tripod setup on uneven, windy terrain. The coastal cliffs of Cape Breton are notorious for unpredictable, powerful gusts, where winds of 40-50 mph are common. A poorly placed tripod can act like a sail, toppling over and sending thousands of dollars of camera gear—and potentially you—over the edge.
The single biggest mistake is placing tripod legs on fragile vegetation or loose soil right at the cliff’s edge. This ground can easily give way. Another critical error is extending the center column, which raises the camera’s center of gravity and makes it far more susceptible to wind. Always keep the center column as low as possible for maximum stability. Even when mounted, keep your camera strap around your neck as a final line of defense. The wind can be strong enough to loosen even a securely tightened mount.
Your Essential Cliff-Edge Tripod Safety Protocol
- Leg Placement: On a slope, always place one tripod leg pointing directly uphill and the other two pointing downhill. This creates the most stable base.
- Firm Footing: Press the tripod feet firmly into solid ground. Never place them on delicate moss, loose gravel near an edge, or fragile vegetation. Use spiked feet if your tripod has them.
- Lower Center of Gravity: Keep the center column completely lowered. If your tripod has a hook, hang your camera bag from it to add weight and stability.
- Strap On: Always keep the camera strap around your neck, even when the camera is attached to the tripod. A sudden gust of wind can be disastrous.
- Respect the Edge: Set up your tripod several feet back from the absolute edge of any cliff. You can still achieve a dramatic composition without putting yourself and your equipment in a precarious position.
Treating every cliff-side setup with this level of caution is not optional; it’s essential for a safe and successful shoot on the Cabot Trail.
How to Find a “Kitchen Party” Vibe in a Formal Celtic Venue?
After a day of shooting, immersing yourself in Cape Breton’s legendary music scene is the perfect way to cap it off. But many visitors make the mistake of looking for an authentic “kitchen party” in a formal concert hall. The true, spontaneous energy of Celtic music is rarely found in ticketed events; it’s found in community halls, pubs, and informal gatherings. The key is knowing the right terminology and where to look.
First, understand the language. As one local music expert explains, a “Ceilidh” (pronounced kay-lee) is a more structured social event, often with dancing and a set list of performers. While fun, it’s more of a show. What you’re likely looking for is a “Session,” an informal gathering where musicians play together for the love of it. This is the closest you’ll get to the mythical kitchen party vibe in a public space. These are rarely advertised in major tourist brochures.
A ‘Ceilidh’ (kay-lee) is a more social gathering with music and dancing, while a ‘Session’ features musicians playing informally, the closest to a kitchen party
– Local Music Expert, Cape Breton Celtic Music Guide
To find these gems, you have to go local. Skip the big venues and head to pubs in towns known for music, like Mabou or Judique (the latter being home to the Celtic Music Interpretive Centre). The best tactic is simply to ask a local: your B&B host, a server at dinner, or a shopkeeper. Ask them, “Where’s the music tonight?” This simple question can lead you to an unadvertised ceilidh at a parish hall or a lively session at a local legion, offering a far more authentic and memorable experience than any formal concert.
Frequently Asked Questions About Cabot Trail Photography
Can I fly a recreational drone anywhere in Cape Breton Highlands National Park?
No, recreational drone use is strictly prohibited within all boundaries of Cape Breton Highlands National Park without special permits.
Are there areas outside the park where drone flying might be permitted?
Yes, certain villages and areas outside park boundaries may allow drone use, but you must check Transport Canada’s drone site map and local bylaws first.
What alternatives exist for capturing aerial-style shots without a drone?
Use a GoPro on an extension pole from high vantage points, or find naturally elevated lookouts along the trail that provide aerial-like perspectives.