In summary:
- Your camera’s automatic settings are designed to fail in snow; you must manually overexpose to capture true white.
- Extreme cold can cut your battery life by 50%; a body-heat rotation system is non-negotiable.
- Safe and ethical photography in Canada requires long lenses (400mm+) to respect mandated wildlife distances.
- Post-processing is essential to correct the natural blue cast snow picks up from the sky.
- Predicting the Northern Lights requires looking beyond the KP index to more specific data like the Bz component.
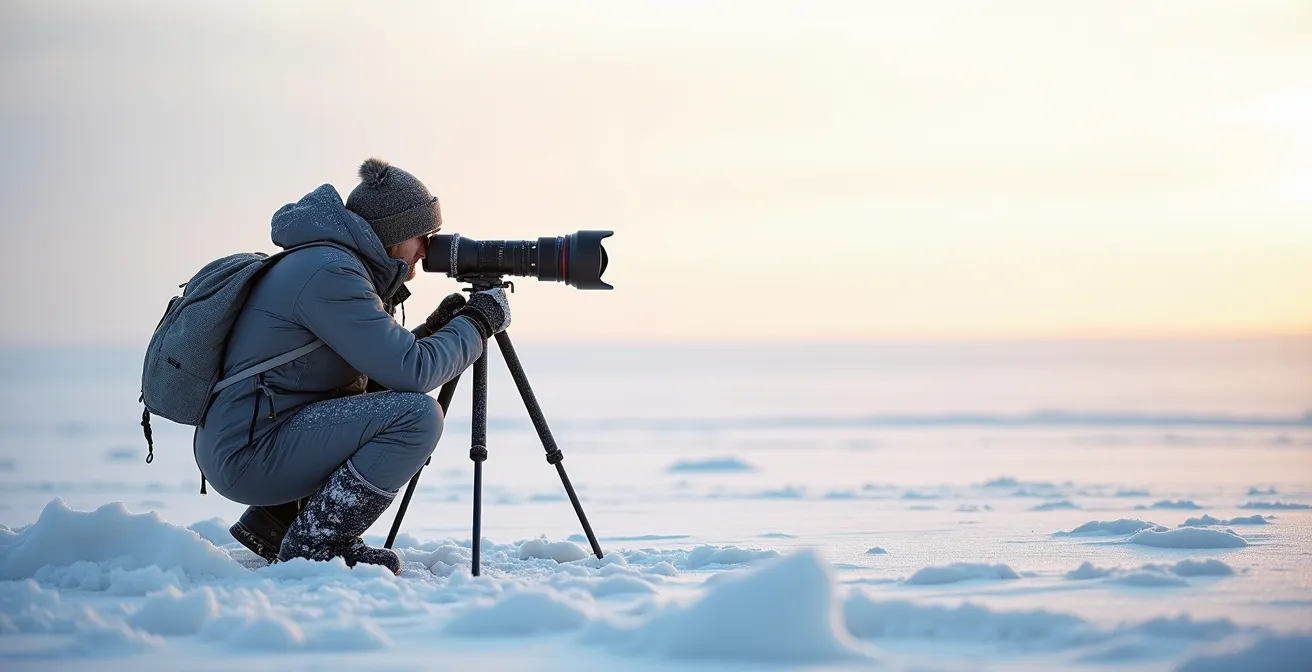
The vision is iconic: a majestic polar bear against a pristine arctic backdrop, or a bull moose standing proud in a snow-dusted forest. For many photographers, capturing Canada’s winter wildlife is a bucket-list dream. But the reality is often a series of frustrating failures. Your expensive camera, so reliable in normal conditions, suddenly produces dull, grey images of snow. Your batteries die in minutes, and your fingers are too numb to adjust the settings. The common advice—”dress in layers,” “bring spare batteries”—barely scratches the surface of the challenge.
The truth that separates amateurs from pros in this environment isn’t just better gear; it’s a fundamental understanding of the physics of cold and the psychology of the animals. It’s about anticipating the specific ways your equipment will be deceived by the bright, monochromatic landscape and how the cold will systematically attack its weak points. This isn’t just about protecting your gear; it’s about overriding its automated instincts to capture the scene as your eye sees it, not as the camera’s sensor misinterprets it.
This guide moves beyond the basics. We’ll deconstruct why your camera fails in the snow, provide the technical settings to get it right, and outline the non-negotiable safety protocols for interacting with Canada’s most formidable wildlife. We will explore the science of battery preservation, the art of focusing in total darkness, and the simple post-processing steps to make your images truly shine. Prepare to master the freeze.
This comprehensive guide is structured to build your expertise systematically, from in-camera exposure and field safety to advanced techniques for night photography and post-processing. Explore the sections below to master each critical aspect of cold-weather wildlife photography.
Summary: A Technical and Ethical Guide to Canadian Winter Wildlife Photography
- Why Your Automatic Settings Turn Polar Bears Grey Instead of White?
- How to Photograph Moose Without Provoking a Charge During Rutting Season?
- 400mm vs 600mm: Which Lens Is Mandatory for Safe Grizzly Photography?
- The Battery Mistake That Ruins 50% of Northern Lights Photo Shoots
- How to Correct Blue Snow Tones in Lightroom in 3 Simple Steps?
- How to Focus Your Lens on Infinity in Pitch Black Conditions?
- The Exposure Setting That Makes Glacial Ice Look Bright White Instead of Grey
- How to Track the KP Index to Predict Northern Lights in the Yukon?
Why Your Automatic Settings Turn Polar Bears Grey Instead of White?
The single most common frustration for photographers new to snowy landscapes is seeing their brilliant, white scenes turn into a dull, muddy grey on their camera screen. This isn’t a flaw in your gear; it’s a predictable deception. Your camera’s light meter is calibrated to see the world as 18% grey. When it’s confronted with a vast, bright white scene—like a polar bear on snow—it assumes the scene is too bright and deliberately underexposes the image to bring it back to that middle-grey average. Your camera is actively working against you.
To counteract this, you must take manual control and tell the camera what it’s seeing is correct. This is done using exposure compensation. For bright, white-on-white scenes, you need to intentionally overexpose the image. A field study shows that for optimal results, photographers in Churchill recommend increasing exposure by +1 to +2 stops. This adjustment forces the camera to render the snow as the bright white it truly is, which in turn properly exposes the polar bear. Without this compensation, the bear will appear dingy and the snow will look lifeless.
The precise amount of compensation depends on the lighting and composition. Metering off a mid-tone element, if available (like the bear’s eye or a patch of dark rock), can provide a good starting point, but often you must rely on a trial-and-error process, checking your histogram to ensure the whites aren’t “clipped” or blown out. The following table provides a clear guide for different scenarios.
| Scenario | Exposure Adjustment | Technique |
|---|---|---|
| Polar bear on snow | +1 to +1.5 stops | Meter off contrasting element |
| White landscape only | +2 stops | Use manual exposure mode |
| Backlit polar bear | -3 stops for silhouette | Expose for rim light only |
How to Photograph Moose Without Provoking a Charge During Rutting Season?
Photographing a bull moose in the Canadian wilderness, especially during the autumn rut, is an awe-inspiring experience. However, it’s also a time of heightened danger. Bull moose are flooded with testosterone, making them unpredictable and highly aggressive. Their hearing and sense of smell are acute, but their eyesight is poor, meaning they can be easily startled if you get too close. The key to a safe and ethical encounter is not stealth, but respect for distance. Never assume an animal is tolerant of your presence.
Professional wildlife photographers and Canadian park authorities are clear: maintaining a safe distance is the number one priority. This is not just for your safety, but for the animal’s well-being. As photographer Jason Leo Bantle of All in the Wild Photography states, true nature photography is about respecting the subject’s space. In his words:
The most important tip for photographing nature is to ensure an animal’s well-being. Long camera lenses allow you to take great images while respecting the space of the animal.
– Jason Leo Bantle, All in the Wild Photography
This principle requires gear that can close the distance for you. A standard lens is inadequate and dangerous. You need a powerful telephoto lens to fill the frame without encroaching on the animal’s zone of influence. Following a strict protocol is not optional; it’s a professional requirement for operating in the Canadian wild.
Your Action Plan: Moose Photography Safety Protocol
- Maintain a minimum distance of 100 yards (about 91 metres) from all large wildlife, as recommended by Canadian park experts.
- Use long telephoto lenses (400mm-600mm) to capture impactful shots without compromising this safe distance.
- Never approach an animal or intentionally alter its natural behaviour. Let your lens do the work of getting “closer.”
- Constantly observe the animal’s body language. Pinned-back ears, raised hair on the neck, or stomping are clear signs of agitation. Back away slowly.
- Whenever possible, work with certified local guides who are trained to read animal behaviour and ensure both your safety and the animal’s welfare.
400mm vs 600mm: Which Lens Is Mandatory for Safe Grizzly Photography?
When it comes to photographing apex predators like grizzly bears in the Canadian Rockies, the debate over focal length transcends creative choice—it becomes a matter of mandatory safety. Parks Canada mandates a minimum distance of 100 metres (110 yards) from any bear. At this distance, a standard lens renders a grizzly as a tiny speck in the landscape. The question isn’t whether you need a telephoto lens, but whether a 400mm is sufficient or if a 600mm is truly necessary.
While many guides suggest a minimum 300mm telephoto lens for Arctic wildlife in general, grizzlies are a special case due to their size, speed, and potential threat. A 400mm lens on a full-frame camera at 100 metres will give you a decent environmental portrait, showing the bear within its habitat. However, it will not deliver the frame-filling, detailed shot most photographers envision. To achieve that level of impact while respecting the legal and ethical safety distance, a 600mm lens is often the professional standard. Many photographers extend this reach further with a 1.4x teleconverter, effectively shooting at 840mm.
The visual difference is stark. The illustration below simulates how a grizzly bear appears through each lens from the same safe distance, making it clear why longer focal lengths are not a luxury, but a necessity for creating compelling images without endangering yourself or the animal.
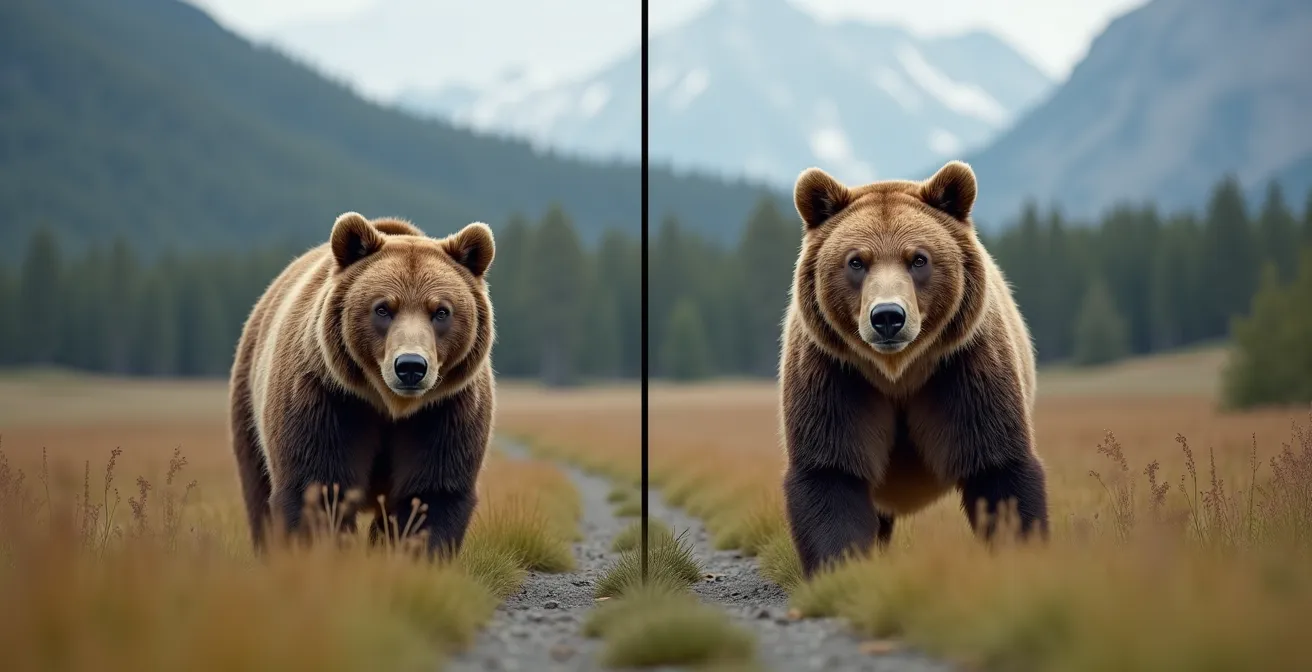
Choosing a 600mm lens (or longer) is a declaration that you prioritize safety and ethics over convenience. It allows you to become an invisible observer, capturing intimate moments of natural behaviour without causing stress or altering the animal’s actions. It is the tool that enables responsible, high-impact wildlife photography in Canada’s most untamed environments.
The Battery Mistake That Ruins 50% of Northern Lights Photo Shoots
You’ve travelled to the Yukon, the sky is clear, the aurora forecast is promising, and you’ve set up for the shot of a lifetime. You take a few test frames, and then—nothing. Your camera is dead. This scenario is tragically common, and it’s caused by a fundamental misunderstanding of how cold affects battery chemistry. Lithium-ion batteries do not “die” in the cold; their internal chemical reaction simply slows down, drastically reducing the voltage output. This is a critical point: an analysis has shown that a drop of 10°C can cause battery life to deplete by as much as half. At -20°C or below, a fully charged battery can appear completely drained in a matter of minutes.
The single biggest mistake is leaving a battery in the camera when you’re not actively shooting. The ambient cold leaches its power silently. The professional solution is not just bringing spares, but implementing a “Warm Pocket Rotation System.” This active management system treats your body heat as a crucial piece of gear.
This system ensures you always have a warm, ready-to-go battery, and it can even “revive” a battery that appeared dead in the cold. Here is the exact protocol to follow:
- Store All Spares Inside: Keep at least 2-3 fully charged spare batteries in an inner jacket pocket, close to your body. Do not store them in your camera bag.
- Use One, Warm Two: Only one battery should be in your camera at any given time. The rest must stay warm.
- Swap and Warm: As soon as your camera’s battery indicator begins to drop, immediately swap it with a warm spare from your pocket.
- Revive the Cold Battery: Place the “dead” battery you just removed back into your warm inner pocket. After 20-30 minutes of warming, it will often recover a significant portion of its charge and can be used again later.
- Remove During Inactivity: If you’re waiting for the aurora to appear or taking a break, take the battery out of your camera and put it in your pocket.
Failing to follow this discipline is the number one technical reason for failed photo shoots in extreme cold. Your camera can handle the temperature; your batteries cannot without your active help.
How to Correct Blue Snow Tones in Lightroom in 3 Simple Steps?
After a successful day shooting in the snow, you might be dismayed to find your images have a distinct and unnatural blue cast. This isn’t a mistake you made in the field; it’s a natural phenomenon. On a clear day, the white snow acts like a giant mirror, reflecting the deep blue of the sky. Your camera, even with a custom white balance, often struggles to fully neutralize this powerful colour contamination. Fortunately, correcting this in post-processing with a tool like Adobe Lightroom is a simple, three-step process that can restore the clean, brilliant white you remember.
The goal is to neutralize the blue without making the image feel artificially warm or sterile. You want to reclaim the true white of the snow while preserving the crisp feeling of a cold day. These steps give you precise control over the colour, moving from a broad adjustment to a fine-tuned one.
Here is the professional workflow for achieving perfect snow tones in Lightroom:
- Step 1: Set a Neutral Starting Point. In the Develop module, select the White Balance eye-dropper tool. Find an area in your image that should be a neutral mid-tone grey or white, but avoid clicking on specular highlights (the brightest, most reflective parts of the snow), as they can fool the tool. A shaded patch of snow often works best. This single click will often get you 80% of the way there by neutralizing the most obvious blue cast.
- Step 2: Fine-Tune with Temperature and Tint. The eye-dropper is a great start, but often requires manual refinement. Use the Temp and Tint sliders in the Basic panel. Gently move the Temp slider towards yellow to counteract any remaining blue. Be subtle; a little goes a long way. If a magenta or green cast appears, use the Tint slider to balance it out. Your eye is the final judge.
- Step 3: Isolate and Control the Blues. For ultimate precision, go to the HSL/Color panel and click on “Luminance.” Select the blue channel. By increasing the luminance of the blue channel, you can brighten just the blue tones in the image, effectively making the blue-tinted snow whiter without affecting the other colours in your photo. This is the secret to clean whites without sacrificing the overall colour integrity of the scene.

How to Focus Your Lens on Infinity in Pitch Black Conditions?
Photographing the Northern Lights or the Milky Way over a frozen Canadian landscape like Alberta’s Abraham Lake presents a unique challenge: it’s impossible to use autofocus. In pitch-black conditions, your camera’s AF system has nothing to lock onto, and it will simply “hunt” back and forth, producing blurry images. You must focus manually. The goal is to set your lens to “true infinity” to ensure distant stars are perfectly sharp points of light. However, simply twisting your lens to the infinity symbol (∞) on the barrel is a common and critical mistake, as most modern lenses focus *past* true infinity.
At -20°C, fiddling with a focus ring with frozen fingers is a recipe for disaster. Preparation is everything. The professional approach involves finding and marking your lens’s true infinity focus point *before* you are in the dark and cold. This requires a systematic protocol that gives you multiple ways to achieve and verify a tack-sharp focus.
Follow this checklist to guarantee sharp stars every time:
- Mark Your Lens in Daylight: During the day, use your camera’s Live View, magnified to 10x, and manually focus on a very distant object (a mountain peak, a far-off tree). When it’s perfectly sharp, use a white paint pen or a small strip of gaffer tape to mark the exact alignment of the focus ring with the lens barrel. This is your true infinity mark.
- Use a Distant Light: If you didn’t mark your lens, use Live View (magnified) to focus on the most distant light source you can find, such as a street light from a town miles away or even a bright planet or star.
- Enable Focus Peaking: Turn on your camera’s focus peaking feature. This will highlight the sharpest parts of your image with a bright colour (usually red or yellow). As you adjust your focus ring, the stars will “light up” with the peaking colour when they are in perfect focus.
- Shoot a High-ISO Test: As a final check, take a test shot at a very high ISO (e.g., 25,600). This allows for a fast shutter speed. Immediately zoom in on the image playback to 100% and check that the stars are sharp, pin-point dots, not soft blobs.
- Lock It Down: Once you’ve achieved perfect infinity focus, use a small piece of gaffer tape to lock the focus ring in place. This prevents you from accidentally bumping it in the dark.
Key Takeaways
- To photograph white snow correctly, you must manually override your camera’s meter and add +1 to +2 stops of exposure compensation.
- Always respect wildlife and local regulations; a 400-600mm lens is essential for maintaining safe distances (100m+) from large animals like bears and moose.
- Manage battery life in extreme cold by using a “Warm Pocket Rotation System,” keeping spares close to your body and swapping them regularly.
The Exposure Setting That Makes Glacial Ice Look Bright White Instead of Grey
Photographing glaciers presents a different challenge than snow. While snow is reflective and opaque, glacial ice is translucent and often emits a deep, ethereal blue. A common mistake is to treat it like snow and overexpose it, which can wash out its unique colour and texture. As noted in a professional photography guide, the goal is often not pure white but vibrant blue. The guide states:
The goal isn’t ‘bright white’ but ‘translucent blue’. Underexposing glacial ice makes it look grey and flat.
– Photography Technique Guide, Glacier Photography Best Practices
The key is a technique called “Exposing to the Right” (ETTR). This means adjusting your exposure so the histogram is pushed as far to the right as possible without clipping the highlights. This captures the maximum amount of light data, which is crucial for bringing out the subtle blue tones and translucency of the ice in post-processing. Simply underexposing leads to a flat, grey image with no depth, while overexposing blows out the detail and colour.
The right exposure and filter choice depend heavily on the type and condition of the ice you’re photographing. Fresh, deep-blue glacial ice requires a different approach than snow-covered ice fields. A circular polarizer (CPL) is often an essential tool, as it cuts down on surface glare and saturates the natural blues within the ice, revealing its depth. This table from a Nikon guide on arctic photography breaks down the ideal settings for different conditions.
| Ice Type | Exposure Adjustment | Filter Recommendation |
|---|---|---|
| Fresh glacial ice | ETTR (Expose to Right) | Circular Polarizer (CPL) |
| Snow-covered ice | +1 to +1.5 stops | UV filter only |
| Blue glacial ice | 0 to +0.5 stops | CPL essential |
| Backlit ice | -1 to -2 stops | Graduated ND filter |
How to Track the KP Index to Predict Northern Lights in the Yukon?
For any photographer venturing into the Canadian north, capturing the Aurora Borealis is the ultimate prize. Most beginners are told to track the KP index, a scale from 0 to 9 that measures geomagnetic activity. While it’s a useful starting point—a KP of 4 or 5 is generally needed for a good show in the Yukon—relying on it alone is a common mistake. The KP index is a global, planetary-level forecast, and it doesn’t guarantee a visible aurora at your specific location.
To truly increase your chances, you need to look at more immediate and specific data that the pros use. Two key indicators are often more important than the KP index: solar wind speed and the Bz component of the interplanetary magnetic field (IMF). A high solar wind speed means more charged particles are hitting our atmosphere. More importantly, the Bz component must be oriented southward. A strong, negative Bz opens a “door” in Earth’s magnetosphere, allowing those particles to pour in and create a spectacular light show, sometimes even when the KP index is low. Conversely, a positive Bz can mean a quiet night even with a high KP.
Use apps and websites like SpaceWeatherLive or the NOAA Space Weather Prediction Center that show you this real-time data. Look for a sustained negative Bz (the lower the better) and high solar wind speeds. This data, combined with a clear weather forecast for your location and the local position of the “auroral oval” (the ring where auroras typically occur), gives you a much more accurate and actionable prediction than the simple KP index alone.
Now that you possess the technical knowledge to overcome the challenges of the cold, the true journey of a wildlife photographer begins. It’s time to put these skills into practice. Get out there, explore responsibly, and begin capturing the wild, frozen soul of Canada with the confidence and respect of a professional.
Frequently Asked Questions on Wildlife Photography in Canada: How to Protect Your Gear at -20°C?
Why is the global KP index often inaccurate for specific locations?
The global KP index provides general magnetic activity levels but doesn’t account for local visibility conditions, cloud cover, or the precise location of the auroral oval over specific regions.
What KP values are needed to see aurora in the Yukon?
KP 3: Faint green arc on northern horizon. KP 4-5: Bright moving curtains overhead. KP 6+: Sky-filling multi-colored corona directly above.
What is more important than KP index for aurora prediction?
The Bz component (interplanetary magnetic field) and solar wind speed are often more reliable indicators. A southward Bz is crucial for strong aurora displays regardless of KP value.